Home /
Strength and Injury Prevention


Strength and Injury Prevention
Nearly all active individuals will experience musculoskeletal injuries at some point in their athletic journey. From beginner, through amateur and all the way to elite, athletes experience injuries for complex and often compounding reasons. As a result, there is often no single cause and no guaranteed way to avoid them. In fact, it’s not always clear what exactly causes the injury in the first place! Even still, there are ways to reduce the frequency and severity of injuries by catching and treating the warning signs. Risk factors like strength, balance, and mobility can be tested and improved upon, unlike some risk factors such as age or injury history. We’re covering a few comon injury risk factors, as well as targeted exercises to address and prevent resulting injuries.
Injury Risk Factor 1: Weak Abductors

Abductors are the muscles on the lateral (outside) part of the glutes and legs that allow your body to raise your leg out to the side, or to maintain a level pelvis when standing on one leg. Since so many exercises, sports or even activities of daily living require unilateral (single leg) stances, strong abductors are critical for everyone. Unfortunately, this is often not the case without targeted effort. As a result, weak abductors can lead to patellofemoral pain (pain behind the kneecap), iliotibial band syndrome, and other knee problems.
Hip, knee and tendon injuries are often seen in sports that require a lot of jumping, high impact, or quick turns. This could be from chronic use or even just the weekend warrior! So how do you know if your abductors are weak, and if you’re at risk of injury? One quick and easy way to test for abductor weakness is the Trendelenburg Test. This test requires the person in question to stand on one leg while the examiner view the individual from behind. It can be helpful to palpate for the posterior iliac spines and place a piece of tape or other marker on either side of the hip. A positive test result would appear if one of the markers drops, while the other remains elevated. A negative test result would occur if both markers stay in line with each other.
To further imagine how this test works, think of the abductor muscles on one side of the body contracting to pull the opposite hip up and level. When this abductor muscle is weak, it’s not able to contract to hold up the hips. As a result, the marker above the elevated leg falls down towards the ground.
Exercise Solution 1: Mini band resisted abduction
After identifying a positive trendelenburg test, correction for weak hip abductors is relatively straightforward. Strength can be built gradually with minimum to no equipment, starting with simply raising each leg out to the side, and back down. This can be done standing or lying to add the challenge to gravity to the working leg. When it’s time to progress, add a small resistance band into the mix is a great way to work on strength in the hips. A few favorite mini band exercises include lateral band walks, clamshells, and fire hydrants.
Injury Risk Factor 2: Tight Hip Flexors
Hip flexors are a group of muscles that run across the front joints of the hip. They attach both above and below the midline of the body. When contracting, hip flexors allow for the knees and chest to come closer together. If you’re sitting while reading this, your hip flexors are in a shortened state. They are rest, but the muscle is not stretched apart. Since most people spend the majority of their day sitting down, that build up of time spent in the shortened muscle state leads to tightness in the hip flexors overtime. You may not notice it in your hips, but if you feel like your hamstrings (the muscles on the back of your thighs) are tight, you may need to stretch your hip flexors, not your hamstrings! The reason for this is because tightness in the hip flexors pulled the front of your pelvis down, like a bucket tipping forward. Since they hamstring attach on the opposite side of the bucket, they get pulled up, pulling them into a lengthened position.
Going about your exercise and training in this tightened hip flexor/lengthened hamstring state can lead to injuries of the hip (including hip flexor strains), hamstring injuries, as well as reduced performance due to a “turning off” of the powerful glute muscles. So not only does stretching your hip flexors improve injury risk, it also can improve athletic performance by allowing the muscles of the lower body and core to function better through their entire range of motion!
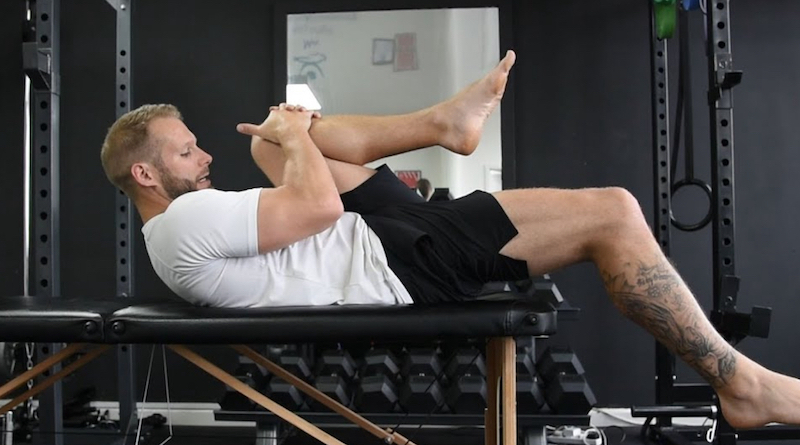
To determine if you have tight hip flexors, you can perform a quick and easy screening called the Thomas Test. In this test, the person in question will sit on the edge of a table, or something long enough to lie down on but high enough so that the feet can’t touch the ground. Sit so that you’re right on the edge of the table, and your entire thigh is hanging off the edge. It should be difficult to remain upright without using your hands to balance. Lie on your back while drawing both knees into your chest. The examiner will observe from the side as the individual lowers one leg down to rest, with the entire lower extremity passively hanging off the table. A positive Thomas Test would occur if the top of the hanging thigh doesn’t reach at least parallel with the ground below. A negative Thomas Test would indicate hip flexor flexibility since the leg is able to relax far enough so that the thigh drops below parallel with the ground. The test would be repeated on both sides.
If the individual has tight hip flexors, the muscle would be unable to stretch far enough to reach parallel. Instead, the angle from the torso to the thigh would be less than 180 degrees, as the muscle tenses and pulls the thigh towards the chest
Exercise Solution 2: Hip Flexor Stretch
Just like weak abductors, the solution for tight hip flexors is relatively simple and requires little to no equipment. But unlike strengthening exercises, the goal of this exercise is to relax, loosen and lengthen the muscle to increase range of motion. There are multiple hip flexor stretches that can be performed, and the correct one for you may depend on just how tight your hip flexors are! I recommend beginning with a simple low lunge, and gradually building up in duration and depth of the stretch until you’re able to elevate the back heel. You’ll notice the low lunge stretch can be performed as a slow pulse, to activate nerve bundles in the muscle to further relax, or as a held stretch. But the key will be to press the hips forward, versus dropping the hips down and into the front leg. As this stretch becomes easier, you can progress the range of motion by propping the back foot up on a stack of books, yoga block, towel, pillow stack or couch for a rear-foot elevated hip flexor stretch.